
The Sony FS7 needs no introduction. Ever since it was announced back at IBC 2014 in Amsterdam, the PXW-FS7 continues to gather momentum with the upcoming release of Firmware Version 3.0, which will give the camera some much awaited features such as 2K centre scan mode for Super 16mm glass and 2/3-inch type B4 lenses and noise reduction in CineEI mode among others. The firmware, however has been delayed yet again; it was supposed to be released in December, but now it looks like it will be made available in January 2016.
However, this doesn’t stop the Sony FS7 from being one of the most significant camera releases of the last 18 months. A few months ago, Sony released the first batch of a series of tutorial videos by adored Sony camera guru Alister Chapman, which we have covered on multiple occasions here and here as well.
Recently a couple of new tutorials were released – one on the various exposure tools available in the Sony FS7, and the other focusing on the slow-motion side of things. So, get yourself a hot cup of tea, sit back, and enjoy the tutorials below.
Sony FS7 Exposure Tools Tutorial
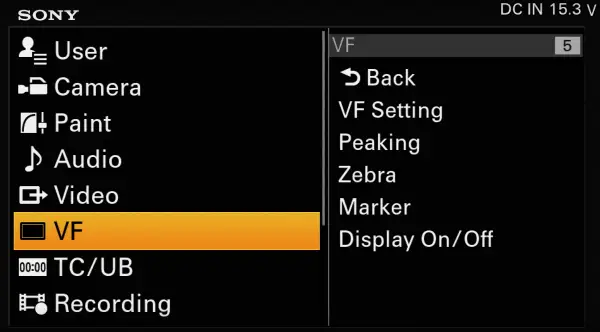
All accessed via the VF page in the FS7 menu – there are three exposure tools available – Zebras, Waveform Monitor, and the Histogram. There’s a few key things to remember about these Exposure Tools and how they measure the image information on the FS7.
- When in CUSTOM Mode – all three (Zebra, Histogram, and Waveform) always measure what is being recorded.
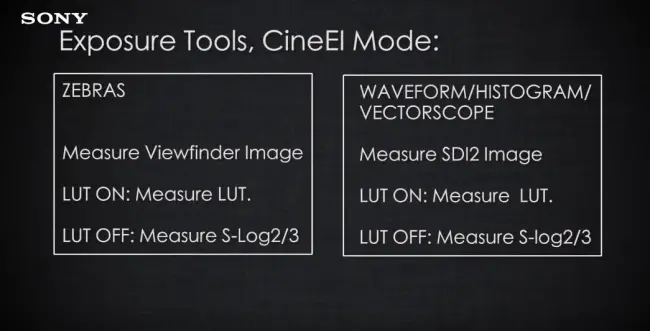
- When in CineEI Mode:
- Zebra – measures the image in the Viewfinder. If you have a LUT enabled in the viewfinder, then the Zebras will measure the LUT, not the recording.
- Waveform – measures the SDI 2 signal
- Histogram – measures the SDI 2 signal
See the graph below for a better visualisation of the differences between what the Zebras and WFM/Histogram measure in CineEI mode.
- Zebra 1 most useful for judging correct exposure for skin tones. It also has an Aperture (window) option with default of 10%, which can be changed in the menu. Once the default of 70% (65 to 75 with an aperture of 10%) is reached the Zebra pattern is triggered in the viewfinder, but of course not recorded.

- Zebra 2 – is different as it does not have an Aperture, but only one value 100% by default, and is triggered once the image crosses that threshold. Very useful for overexposure, once you see it – this means you are very close to clipping your highlights.
- Histogram – familiar to photographers, it represents exposure from left to right – from the Blacks to the Highlights. You are looking for an even spread and a bump somewhere in the middle, depending on your scene for a good exposure.
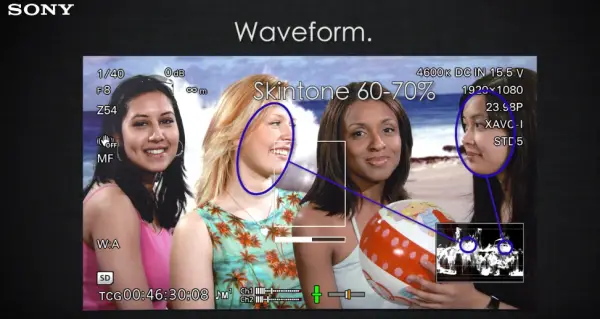
- Waveform Monitor – represents the image physically from left to right – with the IRE scale on the left side vertically from 0 to 100+. A good reference is – skin tones should be upper 2/3rds of the Waveform – near the top, highlights near the very top, and blacks and shadows towards the bottom.
- Skin Tone – 60-70%
- Shadows and blacks – 0-20%
- Highlights – 95-109%
- Important Note – to view the Histogram, Waveform or Vectorscope in the Viewfinder, make sure that SDI 2 and Viewfinder settings are the same!
Sony FS7 S&Q Motion and Picture Cache Tutorial
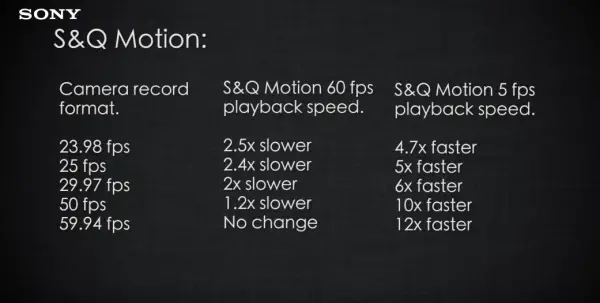
The S&Q Motion (Slow and Quick Motion) is available via a dedicated button on the side of the camera. There are two modes – Normal and HFR (High Frame Rate). In NTSC the maximum slow-motion rate is 180fps, while in PAL it is limited to 150fps.
- In Normal S&Q Mode – the camera does a full sensor readout (1 to 60fps) for maximum image quality.
- in HFR S&Q Mode – at frame rates higher than 60fps, the sensor skips lines (via pixel binning) to allow for a quicker scan thus accommodating a higher frame rate at the expense of some moire and aliasing. In Firmware 3.0 the Centre Scan mode should alleviate some of this, but will in essence introduce a crop as it will read only the central portion of the sensor.
- Watch out for Light Flickering when shooting Slow-motion – street lights and office fluorescent lighting is often flickery as it has a slower refresh rate. HMI’s, Tungsten or high quality LED’s with very high refresh rates are prone to flickering and therefore recommended. Also, play back a few clips when recording slow-motion in such situations to make sure there is no flicker, as this can be difficult to spot while recording.
- No AF or Auto IRIS in S&Q mode
- in CineEI Mode – not possible to have independent MLUTs for Recording, SDI, HDMI or Viewfinder, either all on or all off.
- Picture Cache – allows for 15 seconds pre-roll recording onto camera’s memory buffer.
The FS7 can seem a bit intimidating at first especially to those coming form a DSLR or stepping up from a Sony A7s up to a proper camcorder form factor, but with in time with practice things will start to make sense. I really find these tutorials very informative and easy to follow and I’m looking forward to seeing more of these.
Order Links:
Sony PXW-FS7 – $7,999 (B&H / Adorama)
Sony PXW-FS7K (with 28-135mm f4 OSS Lens) – $10,499 (B&H / Adorama)
Disclaimer: As an Amazon Associate partner and participant in B&H and Adorama Affiliate programmes, we earn a small comission from each purchase made through the affiliate links listed above at no additional cost to you.
Claim your copy of DAVINCI RESOLVE - SIMPLIFIED COURSE with 50% off! Get Instant Access!


