
Many people tend to underestimate the final step of the creative process when it comes to outputting video and uploading their work online on platforms such as YouTube or Vimeo. Even if your footage was shot in Raw and edited using high-quality intermediate codecs like ProRes, Cineform or DNxHD, you still might end up with poor final results if you don’t know how to set up your NLE correctly utilizing the optimal export settings.
There are still many misconceptions related to rendering files using the Adobe Premiere Pro CC in particular as the software already provides a plethora of useful export settings. Tweaking and optimizing them further to get the highest quality possible seems to be the trickiest and most challenging part of the process for the majority of editors and filmmakers alike. The platform works well in this regard, but only when you know how to utilize it properly.
Here’s a quick video tutorial produced by Roberto Blake that covers some of the basics you should be aware of when exporting videos for YouTube.
First and foremost, it’s worth mentioning that it doesn’t matter what version of Adobe Premiere Pro you’re using as long as you have Adobe Premiere Pro CS6 or later as nothing significant has changed in terms of exporting settings in the latest iterations of the software.
With that in mind, when you finish your edit just navigate to File>Export>Media. In the Export Settings panel under format select H.264 which is the officially supported video codec by YouTube required for all videos uploaded to the platform.
Secondly, make sure that your Source and Output settings match perfectly. If for any reason this is not the case in the Basic Video Settings window hit the Match Source button. To get the maximum quality out of your edit, you need to tweak the bitrate settings further which is indeed the trickiest part of the process where most people get confused.
According to official YouTube recommendations, the typical bitrate of your HD videos should be set to 8 Mbps. It’s worth mentioning that there is no bitrate limit required, though, YouTube offers some recommended bit rates for reference that you can find below. If you are uploading 4K video, then you should set a bitrate between 35 and 68 Mbps depending on the frame rate of your footage.
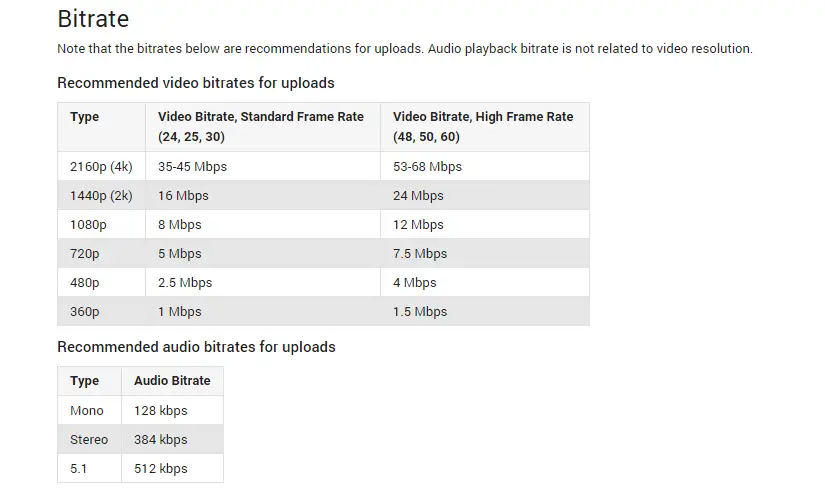
Considering that you are editing HD video, your Target Bitrate video should be set to 8 Mbps. Generally, the Target rate in Premiere Pro CC is the setting that determines the actual size of the rendered file; it’s not the Maximum Bitrate. You can alter the latter as much as you want; still, it won’t affect your video’s file size significantly.
However, if there are parts of your footage containing some high-quality graphics or high motion video the Premiere Pro algorithms will compress these parts using the Maximum bitrate, thus sustaining the optimal quality throughout the whole video without affecting its file size.
It’s important to note that this method will work only if you choose either the 1 Pass or 2 Pass Bitrate Encoding. As a rule of thumb, the 2 Pass Bitrate encoding is the better option as it provides the highest image quality. Keep in mind though that this option will extend the rendering time, but you will get the best possible quality out of your edit.
As for the audio, choosing the AAC format and 320 bitrate will do the job just fine. At last but not least, don’t forget to check Use Maximum Render Quality before hitting Export.
Ultimately, I usually will set my Target Bitrate to 8 Mbps and the Maximum Bitrate to 16Mbps when I’m exporting 24p or 25p HD video using the 2 Pass Bitrate Encoding. If you are still not pleased with the final results, you may tweak the Maximum Bitrate further, but from my experience, the above settings will be more than enough in most of the time providing an optimal balance between the image quality and file size of your video.
[via: Roberto Blake YouTube Channel]
Disclaimer: As an Amazon Associate partner and participant in B&H and Adorama Affiliate programmes, we earn a small comission from each purchase made through the affiliate links listed above at no additional cost to you.


For weddings I use a canon xf-300,a 7d mark2 and a 1dx record in 1920×1080 at 29.97 what do you think would be the best export settings to use in premiere pro will be put on flash drive
Hi, Bobby! Given the fact that your XF-300 camera supports up to 50Mbps bit rate and 4:2:2 color sampling in HD you can bump up the Target Bitrate to 10-15Mbps when exporting depending on the available size on your flash drive. The above settings will be more than in enough in terms of maintaining optimal image quality. Hope this helps!
hey, what setting would you recommend for panasonic footage at 720p, 30fps? I usually go with 8mbps
Not sure I fully understand your quesiton – what camera are we talking about here? What are you shooting? are you acquiring in 720p or delivering in 720p?
Hi, I have never uploaded a video to youtube before and I have never used Adobe
Premier Pro cs6 before, but these are what I have available to use. I have a simple animation video using still images that is about 4 1/2 minutes long which looks great and everything, and your tutorial on how to export makes sense and I think I am doing it right, and I am logged into and linked up with youtube but every time I try to export at the end it says something like cannot find channel. I am assuming that this means a youtube channel but I am not sure and I do not know what to do to set this up correctly and so on. Do you understand what is happening and how to fix this?
What kind a file are you uploading? MP4 will have no problems.
Thank you for the response. I am not sure the file type. this is the first time I have used the program and I do not understand all the settings and configurations, etc. I am trying to follow as best I can with this instructional video.
Isn’t 8 Mbps too low? I’ve rendered at 6 Mbps yesterday and it looked terrible. I tried 15 Mbps looked really good but was huge file for what it was. The properties of the videos I’m splicing say they are 20 Mbps but the ratio of time and space (Gb) is not equivalent to Adobe’s bit rate output. Maybe it’s H.265 that compresses it better?
I always try to set the target to about the same as the source bitrate and then give the maximum a couple mb of clearance. It might be overkill, but the way I see it is most devices that record in MP4 use VBR and the bitrate reported in the metadata is an average, so logically if you’re exporting at the same resolution in the same format, you should match the target with the pre-existing average for the source files.
Everybody insists that “the quality difference isn’t that noticeable,” but personally I’ll notice a 0.5 pixel blur difference and it’ll drive me insane. I don’t let what YouTube does to the video bother me because it’s out of my hands at that point, but up until I hit upload I’m determined to make the video quality the best it can be.
I’ve heard from lots of different sources claiming that YouTube reformats videos to 8 Mbps, but that isn’t reflect in the stats for nerds, when I click that stats on my videos the bit rate shown is usually pretty close to the source file. Regardless, YouTube is going to reformat a video whether it’s configured precises for YouTube or not, and if there’s more data for the converter to work with, the higher quality the converted file will be. In short, converting an 8 mbps file to an 8 mbps file will yield a lower quality 8 mbps file than converting a 16 mbps file to an 8 mbps file.
Hi, great info thanks. But I have a problem and can’t seem to find an answer easily. I want to render a video for my YT channel. This video is of a single, still image with music. I want the music to be of highest possible quality for YT. What are the best settings? Does frame rate or bit rate matter even(I want the image to be quite sharp, but not ‘full’ HD)? The audio is 44.1kHz 16 bit PCM. Should I output 48kHz or 44.1kHz(doesn’t have to be re-sampled)? Should I select sample rate or bit depth precedence? I appreciate ANY help.
44.1 / 16 is good enouhg for youtube in my experience.
Ok thanks for the reply. I have a degree in Music Tech, but video compression confuses me! My other question is; should I reduce the framerate to the lowest possible for H.264 (10fps I think), considering the video is just a single image with music? Thanks
no dont change the video framerate it’ll slow your audio down. just lower the bitrate
Why would it slow the audio down? It’s a separate stream.
You can use 1 FSP! it doesn’t matter because you dont have motion at all. And i recommend to use at least 2-3 Mbps on Target Bitrate so you dont lose image quality, same for max Bitrate. What you really need is the best Audio quality so use AAC audio codec, sample rate of 48000 Hz at and 320kbps audio Bitrate
Thanks Choi. Do you know of any way of getting better quality audio onto youtube? I promised my subs the best audio quality, so do you know of any other format/codec that will give better results that MP4/AAC?
Hey Everyone. I’ve recently purchased a Vimeo Plus account so I could upload a 4k feature as a screener to festivals. I’m allowed 5 GB of space. Is this even possible??? My 4k 444 Prores uncompressed film (1 hour 54 minutes) came out to 5.83 TB. This is true 4k (not UHD). Then, using Media Encoder’s 4k Youtube settings (they don’t have a Vimeo 4k setting yet), it made the film 33 GB. A nice compression but still WAY too big for 5GB of Vimeo Plus space. I then took the 4k 444 Uncompressed ProRes and made an HQ ProRes 422 UHD file which was 500 GB. After using the 4k streaming setting from Media Encoder on the UHD version, it actually made it 0.1 GB larger than the original compressed for web file. Any suggestions? Help!
is it a requirement that the deliverable be in 4K? It would eat up a lot of data for an online screener. Maybe upload to a cloud service and send them the link? with Vimeo, a file of this size would not be possible IMHO.
Not a requirement but I’d prefer a 4k screener than a DVD. I figured if I restrict the data to 5.78 Mbps, it comes out under 5GB but this is far from the 30-60 Mbps they suggest. The only reason I’m using Vimeo is it was suggested by Withoutabox as a better option for sending screeners to festivals.
upgrade your vimeo account to allow larger files. it’s your only option. you could theoretically split the film into chunks and upload a section per week, but… don’t do that.
Can someone please help me?? I’m trying to encode gaming videos but a 15 minute video is 800mb!!!!! And I highly doubt thats normal based off of the 5 hour video that was only 595mb in the video above! What am I doing wrong?
It depends greatly on the content, 800mb for 15 minutes sounds about right, my videos are much, MUCH higher than that before they get encoded in Premiere Pro.
yeah my videos are about 50-60g and then end up being a gb after encoding.
600mb for 5 minutes of video is not really gonna work for longer videos, it’s gonna take ages to upload on youtube.
depends on your internet
If you read YouTube recommendations – do they ever mention quality? Best recommendations as I have found out from my accountants – is best for them- maybe not for me. I started uploading ProRes LT and have had great results which looks to be the highest bit rate – once they process – when using their recommendations – not sure if I am always getting max.
Hi, I’m trying to upload my VR/360 film (3840×2160) to Youtube – Unfortunately it looks super low res no matter what. Do I just need to set the bitrate higher: for 34 mbps?
errrrrrrhhhhhhhhhgggggg 1440p IS NOT 2K… 2K is 1080p/ 2048/1080, NOT 2560*1440, that is 2.5k