
Beyond any doubt, DaVinci Resolve 14 is regarded as one of the most popular and powerful color grading and correction applications in the filmmaking industry. Used by novices and professionals alike, the software has a vast array of features that provides creators with unparalleled creative freedom and possibilities with tools such as precise color wheel adjustments, editing using nodes, and several types of curve options.
According to Alex Jordan, the founder of LearnColorGrading.com and FilmSimplified.com, one of the most effective yet under-utilized tools in Resolve 14 is the Hue vs. Luminance curve, which essentially adjusts the luminance of a specific color (hue).
Although the feature seems pretty straightforward to use, previous versions of the curve made it difficult for users to take advantage of its functionality. With the latest updates to Resolve and especially with the release of version 14, however, utilizing the Hue vs. Luminance curve is even easier now more than ever before.
To take advantage of the asset, select the Hue vs. Lum option under the curves menu. Then, you can either add a point on the curve by clicking on the line in the middle or by selecting one of the colors in the right-hand corner of the curves’ area, which will create three nodes in the spectrum of the color selected. All that’s left to do is to move the point on the curve up/down/left/right and adjust the luminance of the hue to your desire.
This feature is incredibly powerful because it has the ability to drastically change the lighting of your shot. For instance, if one particular color is close to peaking, you could select the hue in the curve and bring it down to reduce its luminance, thereby creating a more balanced image.
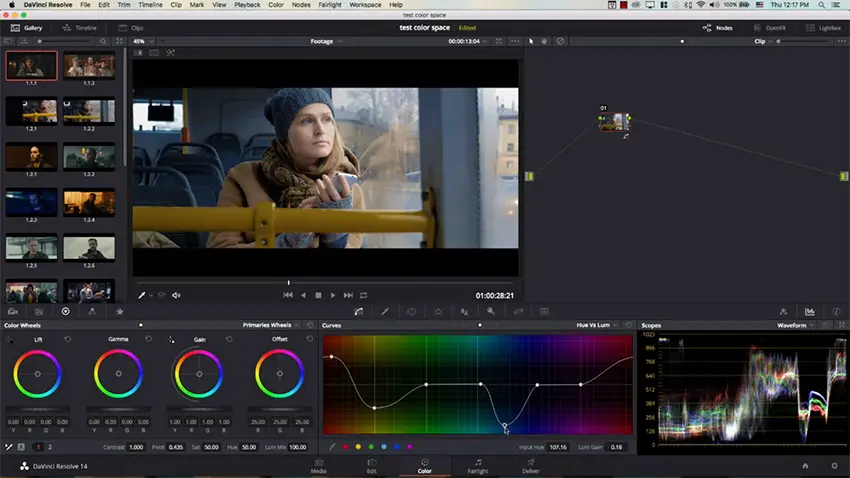
Another excellent example of using the Hue vs. Luminance curve is to shape the light in your scene to create emphasis on a particular subject as showcased in the shot below. By simply raising the luminance of warmer (red/orange/yellow) and turquoise/teal color, and by reducing cooler colors (blue/purple), the lighting of the image allowed the skin of the actors to stand out more from the background.

Of course, the Hue vs. Luminance curve tool is only one of the plethora of powerful assets included with DaVinci Resolve 14. As newer iterations of the program are made each year, we certainly hope that Blackmagic Design will continue to listen to the community’s suggestions and improve on the application, building off the massive success Resolve has gotten throughout the years.
Meanwhile, if you want to dip your toes into professional color grading and learn the basics of DaVinci Resolve 14, you still have the chance to get the Ultimate DaVinci Resolve Course Bundle for just $97.

This exclusive Black Friday deal includes a handful of practical courses such as DaVinci Resolve 14 Grading & Editing Courses, DaVinci Resolve Practice, Color Matching Simplified alongside more than 200 Stylistic LUTs that would otherwise cost you $647 to buy separately. As if that’s not enough, you also get Fairlight 101 Simplified & Fusion 8 Simplified Courses as a gift. The sale ends in less than five hours, so if you want to enroll use the following link.
[source: Learn Color Grading]
Disclaimer: As an Amazon Associate partner and participant in B&H and Adorama Affiliate programmes, we earn a small comission from each purchase made through the affiliate links listed above at no additional cost to you.


