
Many filmmakers tend to forget the days when they were starting. Everything, every process or tool seemed to have some strange alien name or functionality. But then you’ve got experienced, you’ve learned things and mastered the jargon. But what about all of those out there that are beginning their journey right now?
Luckily, some YouTubers are willing to make content aimed at newcomers, detailing all the basic steps that may seem unnecessary to a seasoned vet, but are a nice place to start for all the others. Bitrates and codecs, multiple or single passes, all that stuff… It will take a while but thanks to videos like the one from D4Darious, you’ll easily get to know them.
First things first, let’s take Darius as an example. He has shot his video in 4K. Imported and edited on his machine, downscaling to a 1080p timeline… Now what? Once you choose to open the Export>Media File window, we can dive into it. The first step is understanding which part of our edit we are going to export.
Usually, your timeline will have some bits and pieces of leftovers all around, so it’s usual to set an in and out points for the timeline and export that. If you have a clean edit from head to toe, you can simply leave the entire sequence, and Premiere will export everything until the last frame of the last clip.
On the righthand side of the export window, you’ll see a small dropdown menu. There is usually a decent number of codecs available by default. There will be your AVIs, MXFs and so on, what is commonly used nowadays is MP4 container. If you’re delivering to the web that’s the right choice most of the time.
Underneath there is a second batch of presets sorted by platform and resolution. If your project is in 4K, YouTube 2160p is a good one, as it is 1080p if you shot or edited in HD. But don’t worry too much, all of the options in the preset can be modified later on. The last step for the top part of the window is deciding the file name and export location. Pick them up and let’s head down to the customization part of the menu.
As a rule, the options will be set at the desired value according to the preset you picked up, but almost anything can be changed. For instance, if your timeline is a custom size like the one in the above video that actually has an anamorphic crop, this is where you can adapt it. Base stuff like the frame rate can be left unchanged, while you may keep an eye on the bitrate. Basically, you have two choices to make.
The first is “constant”, but you also have “variable” as an option. If you choose the latter, single or double pass is also available. What does that mean? Constant bitrate is quite self-explanatory: you choose a bitrate and Premiere keeps it steady throughout the clip.
To save space, though, sometimes it’s useful to have variable bitrate, meaning you fix the maximum value and if the frame allows it like if you have static shots where not many elements are changing, you can keep it a little bit lower. This will affect only the file size since it will be skipping the compression of the parts of the image that remain the same.
What about passes then? There are two ways to encode a file in VBR: single pass means the computer takes the file and directly encodes deciding on the fly what bitrate to keep. Two-pass instead means that it first takes the file, analyzes from start to finish, and subsequentially goes for the encoding, based on the previous analysis.
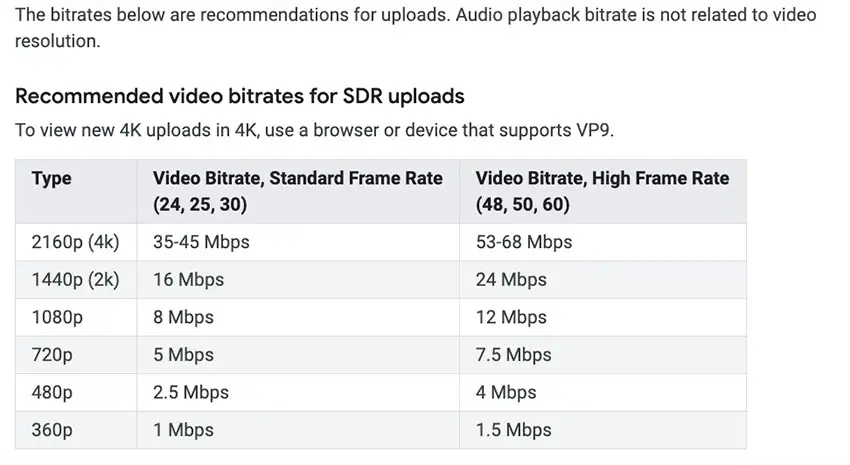
The two-pass processing is a little bit longer but guarantees better results. If you are delivering to YouTube, there is a little nice page with the recommended bitrates for each frame size on the YouTube support pages. We would suggest to crank up a notch the bitrate instead of keeping the suggested ones, to avoid quality loss during YouTube’s re-compression.
We won’t dwell long in audio, AAC at 320kbps, obviously high quality, and the standard settings will do the trick. We can also skip the VR stuff and get to last options that really matter: Use Maximum Render Quality. Particularly if you have different frame sizes or any kind of elaborate projects, this is the way to go.
It’s not recommended to use the previews to export as this means that Premiere will be using the preview files created for the timeline, and while this may get you faster exports, quality may be at risk depending on the settings of the preview.
Time to click the last button; it’s up to you to export directly through Premiere or queuing to Media Encoder. The latter can be useful if you have a bunch of videos to export, but other than that, these are identical. Wait as your computer does its magic and there you are, you’ve exported your video project. Time to get to the next one!
[source: D4Darious]
Disclaimer: As an Amazon Associate partner and participant in B&H and Adorama Affiliate programmes, we earn a small comission from each purchase made through the affiliate links listed above at no additional cost to you.
Claim your copy of DAVINCI RESOLVE - SIMPLIFIED COURSE with 50% off! Get Instant Access!

")

