
Among the first effects many video editors learn is how to remove backgrounds. This is due to the prevalence of green screens and overlay effects that require this knowledge. It also can be a lot of fun.
Fortunately, thanks to software like DaVinci Resolve becoming very, very accessible to filmmakers practically anyone can remove backgrounds easily.
Jordan from Motion Array Tutorials walks us through a few methods of quickly removing backgrounds from images. Specifically, this is meant to help remove simple backgrounds, such as when you have an object on black or white or on a green/blue screen.
Method 1: Black/White Backgrounds
This section goes over how to deal with elements that have basic black or white backgrounds. This could be something like an overlay effect – such as snow falling that you want to put over top of your footage. There are tons of stock footage sites that will provide footage like this.
To start, you’ll need to make sure that your effect is ready to be overlaid on your clip. This means making sure it is in the proper place on the timeline on the track above the targeted clip. Once there, all you have to do is select the element and head to the Inspector panel.
From here, go to the Composite Mode option and select either Multiply for white backgrounds or Screen for black backgrounds. In many cases, especially stuff from stock websites that are optimized for this usage, that might be all you need to do. Adjusting opacity and maybe adding blur can help blend it in even more realistically as well.
For moments where it doesn’t quite work there is another option: using Fusion.

Image Credit: Blackmagic Design
Select the element and then tab over to the Fusion page. It looks intimidating but don’t worry. Selecting the MediaIn node hit Shift + Spacebar to get a list of tools. Pick the Luma Keyer.
You might need to attach it manually to your clip. Pull the line and drag it to the LumeKeyer from the MediaIn. Then you’ll need to select the other end and bring it to the MediaOut node. It all flows in order. Makes sense.
Now that it’s all linked you might see the effect starting to work. Now you’ll need to adjust it. Selecting the keyer node head to the inspector again and you’ll find your controls.
Start by adjusting the Luminance ranges until you can eliminate as much of the background as you want without hurting your subject. Feel free to zoom in if it helps.
Using the Contrast/Expand slider and Blur you can refine this selection even more. Just play around until it looks good.
Method 2: Colored (Chroma) Backgrounds
The second method is for chroma backgrounds, commonly green and blue screens. Timeline position should be the same, just above the clip you want it to overlay on. Then, select the element you need to remove the background from and head to the Color page.
Looking at the Nodes you need to right-click and add an alpha output. This will make a blue dot appear on the right side. You’ll need to drag to connect the blue square output of the main node to the blue output circle on the right.
With that done head done to the Qualifier menu, represented by the eyedropper icon. Head to the Selection Range and choose the picker icon. Use this tool to select the background color.
You’ll want to pick the best average, usually close to the element you want to stay in the frame. Then head back to the Selection Range and select Invert, the circular icon to the right.
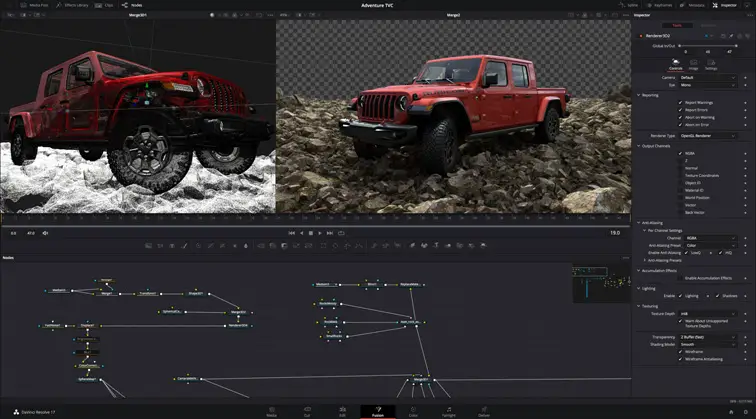
Image Credit: Blackmagic Design
It is probably not perfect. This is when the Hue, Saturation, and Luminance bars come in handy. Start with hue and adjust the select to make sure all the shades of the color you hope to cut out are selected – you should see the changes happen immediately.
Saturation is next and make adjustments. This might do the trick. Using the high/low soft adjustments can help finesse the key. Finally, do the same for luminance.
If you still have some speckling, the Matte Finesse tools are there to finish the job. Clean Black is a very effective tools. But don’t we afraid of Denoise, Blur, or In/Out Ratio. Just be cautious with any outlines or haloing that might result from changes.
See, nice and easy. Do you have another method you use for keying out backgrounds?
[source: Motion Array Tutorials]
Disclaimer: As an Amazon Associate partner and participant in B&H and Adorama Affiliate programmes, we earn a small comission from each purchase made through the affiliate links listed above at no additional cost to you.

