
A major talking point for cameras in the past few years has been bit depth. Related to that is chroma subsampling. There’s 8-bit, 10-bit, raw flavors that push even higher plus each of these might have variations of subsampling of 4:2:0, 4:2:2, or even 4:4:4. It’s getting into some highly technical but very important areas of digital imaging systems.
This is also something that very much matters to video production as it will affect the overall quality and flexibility of your footage. If you want to take a deep dive into this technical subject Dom over at LensProToGo takes a stab at it.
If you haven’t yet dug into these extra numbers you likely have seen them tossed around on some spec sheets. For example, a lot of newer cameras are boasting about doing 4K 10-bit 4:2:2 internally. The 10-bit figure is referring specifically to the bit depth while the trio of numbers (4:2:2 in this case) is the chroma subsampling. They are usually bundled together in conversations.
Generally, the higher the number the better. Most people likely don’t know all the specifics about why they are better or exactly how big of a difference some options are from others.
No matter what, the camera you use has made some decisions on what options are available. Digital imaging demands processing and some compression.
The bit depth and subsampling are one of the choices for how to compress the imagery. It’s rare to see uncompressed footage at all, except if you are working directly with raw and even that is sometimes compressed.
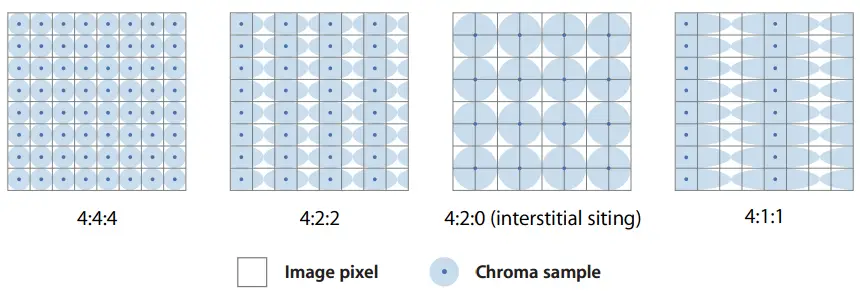
Image Credit: Apple
Compression is important as it makes video usable. Uncompressed files are large and tough on computers while compression makes it easy to send around, stream, and store the footage.
When you talk about human vision, we are much more able to tell between shifts in brightness/luminance than we are between very subtle shifts in color. This means that when compressing an image you can likely start compressing the color information first without making noticeable decreases to overall image quality. With that in mind let’s take a closer look at chroma subsampling.
We are looking at that “a:b:c” figure. This determines how many photosites (what most people call a pixel) we are taking this information from. The “a” refers to horizontal region and this usually means two rows of four.
The “b” refers to how many variations can occur, meaning you are likely using 2 or 4. The final “c” number refers to the bottom row, talking about what is shared between the top and bottom row in variations.
This is difficult to parse without some practical examples. Let’s stick with the three most common sampling systems for video applications:
- 4:2:0
- 4:2:2
- 4:4:4
The 4:2:0 is common and quite basic. The eight pixel array has eight difference luminance values, L1-L8. In 4:2:0 the chroma samples are grouped by every two pixels, meaning that there are only two different value per row. Then the final “0” means that when you double the row to two you will essentially just be getting an exact copy of the first row.
As you look at it you will see that there is a lot of shared information. Each 4-pixel square shares color information. It’s very compressed, though you are giving up a lot of color information.
The interesting thing is that a ton of video, especially exported and uploaded videos, use this space. When done right you may not notice a huge degradation in quality.
Moving up to 4:2:2 gives you a lot more information. While the first row looks the same between 4:2:0 and 4:2:2, the second row of 4:2:2 can use two completely different color samples. This essentially doubles the amount of color information available in the 4×2-pixel array.
Finally, 4:4:4 is the top-of-the-line for most. Every sampling area is able to hold its own chroma and luminance values. This is a very rich file—it’s also going to be a very large file.
Bit depth is a major factor in the actual results. It actually will have a larger impact on your footage than the chroma subsampling. That is because bit depth refers to the total range of colors available in the codec.
In 8-bit encoding, you are limited to a range of 16.7 million colors. For comparison, 10-bit allows you to capture just over 1 billion colors. The jump from 8-bit to 10-bit is the most effective way to improve quality of image capture.

Image Credit: Atomos
Now, you can get even higher bit depths, though this generally will be tied to a raw format. ProRes RAW captured from the output of many cameras is usually in a 12-bit format.
ARRI and RED codecs can even push up to 16-bit. These systems usually require much more advanced systems and it is almost a guarantee that they will take up more space.
There’s a lot going on here. Do you have a better understanding of these highly technical terms after watching this video?
[source: LensProToGo]
Disclaimer: As an Amazon Associate partner and participant in B&H and Adorama Affiliate programmes, we earn a small comission from each purchase made through the affiliate links listed above at no additional cost to you.
Claim your copy of DAVINCI RESOLVE - SIMPLIFIED COURSE. Get Instant Access!


