
Not everyone can afford to have the latest and greatest computer at all times. Some of us are often using hardware that is just a bit more out of date then we would like for the cameras and footage we are working with today.
Still, editing 4K is doable on pretty much any computer with a few key workflow tweaks and settings.
If you want to find out how to pull this off when you are using Adobe Premiere Pro then there is no better place to turn than Premiere Basics. Even if you aren’t running into slowdowns all that often, using these tips will help eliminate them.
Proxies
This is one that I hope everyone knows by now. Proxies can make editing even the most intense footage incredibly easy. In Premiere you can create proxies by heading to the project window and selecting your footage. Right-click and you will see a Proxy option. Head there and click Create Proxies.
Proxies are lower resolution and/or alternatively compressed files that are much easier on your computer. The recommendation here is ProRes Low Resolution Proxy as ProRes is a great editing codec that is easy on computers. Plus, the lower resolution will also save you.
Premiere can be set up to do this automatically in the Project Settings. In the Ingest Settings you can turn on creating proxies when new footage is added. Now it’ll be done automatically.
To make sure you are using these proxies head to the Button Editor and find the Proxy button. By pressing this button you can switch between the proxies and original footage.
Cache
Something you may encounter is a filled hard drive with all the files being saved to cache. To fix this you’ll want to head to Edit > Preferences > Media Cache. There should be a nice Delete button that lets you delete all unused media cache files.
There is a better way to handle cache. Ideally, you will want to use a second drive for your cache so that your main drive isn’t being bogged down by being both the cache and main storage.

Image Credit: Solidigm
Pick up an extra SSD – the faster the better. You can use either internal or external SSDs, but with externals, you’ll want to make sure you have a fast interface. For internals, there are good options, though they recommend the Solidigm P41 Plus PCIe 4.0 NVMe M.2 SSD.
Tricks
There are a few other things you can do as you work to speed up Premiere. One is to clear out all the unused or duplicate footage you have loaded in. To do this quickly all you need to do is head to Edit > Remove Unused. There’s also a Edit > Consolidate Duplicates for repeat footage.
Working with After Effects Compositions is often a cause for stuttering playback. To get great playback you can duplicate the clip on another track and then right-click and hit render and replace.
This will create a rendered clip that will play back just as well as a normal file. Plus, since you duplicated it you still have access to the original composition if you need it.
On Windows you might be able to get a little more juice into your PC – literally. Windows by default has some power saving options. In the Control Panel > Hardware and Sound > Power Options you can find an Ultimate Performance or High Performance Plan to make sure your computer is doing as much as it can.
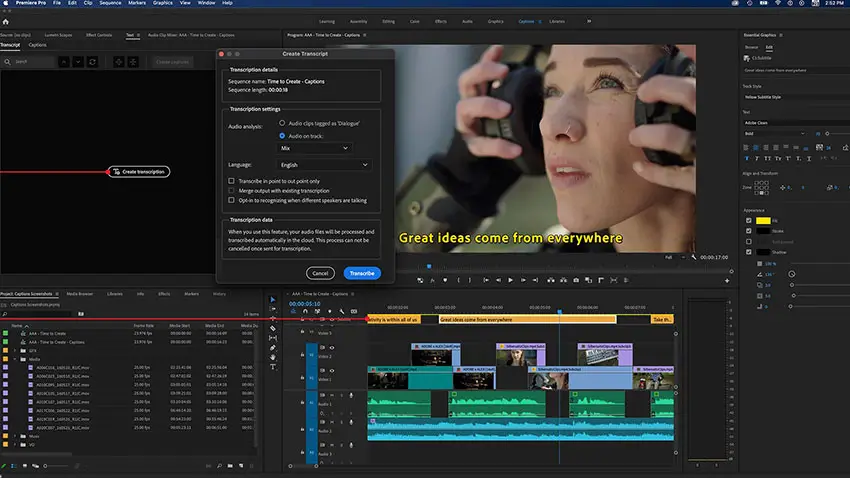
Image Credit: Adobe
Effect-heavy projects can have difficulty even on more powerful machines. Another Button Editor option is the Effects Toggle. With this you can quickly turn on or off all the effects in the project for smooth playback.
Another trick for specific hardware, NVIDIA graphics cards in this case, is to change some settings to maximize performance. Enter the NVIDIA Control Panel from right clicking the desktop and select use the advanced 3D image settings.
Head to the manage 3D settings and select Premiere in the program dropdown. Find Texture filtering quality and set it to high performance, the trilinear optimization to on, threaded optimization to on, and anisotropic sample optimization to on. Finally, set the OpenGL rendering GPU to your GPU. Apply and enjoy.
One final setting to check out in Premiere will help make all these changes worth it. Under File > Project Settings > General you should make sure the GPU Acceleration mode is enabled.
Do you have any tricks you use to give Premiere a performance boost?
[source: Premiere Basics]
Order Links:
- Adobe Creative Cloud (B&H, Amazon)
- Adobe Premiere Pro CC (B&H, Amazon)
- Solidigm P41 Plus PCIe 4.0 NVMe M.2 SSD (Amazon)
Disclaimer: As an Amazon Associate partner and participant in B&H and Adorama Affiliate programmes, we earn a small comission from each purchase made through the affiliate links listed above at no additional cost to you.

")
