
Finding out of the best way to get optimal results when exporting your 4K videos in Adobe Premiere Pro CC for YouTube could be a bit tricky and definitely can take some time to nail it down. With the advent of 4K acquisition, exporting those files with the maximum image quality becomes even more crucial for your professional workflow especially when considering that 4K resolution isn’t nearly as forgiving as 1080p when it comes to resolving detail, compression artifacts, and noise levels.
So, to completely eliminate the trial and error and maximize the results produced at this particular stage of the post-production process, Maxwell Ridgeway showcases his personal workflow regarding the export of 4K videos optimized for YouTube in Adobe Premiere Pro CC.
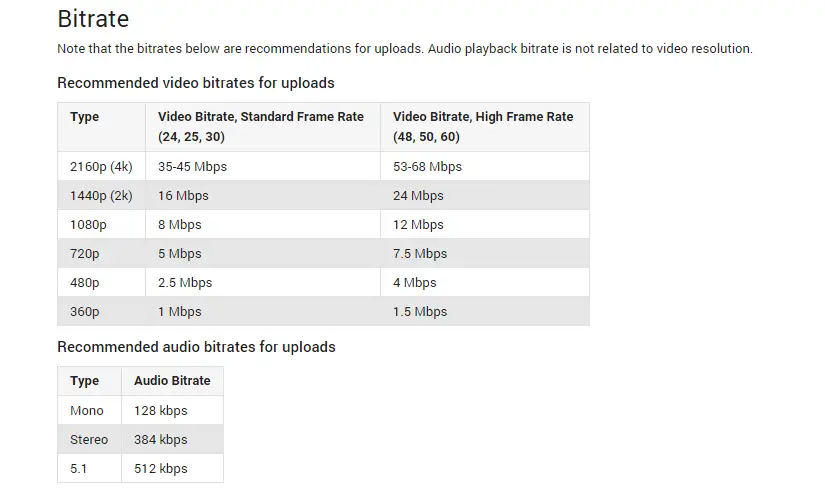
According to official YouTube recommendations, the average bitrate of your 4K clips should be set between 35 and 45 Mbps when it comes to 24p, 25p or 30p video whereas for higher frame rates you should opt for settings between 53 and 68 Mbps. Keep in mind, though, that these values won’t produce the best possible image quality on each and every occasion, so use them just as a reference.
Since there’s no bitrate limit required, personally, I would rather choose a bit higher bitrates, even for a 24p clip, just to make sure that there won’t be any compromises whatsoever. When you export your video while using the CBR (Constant Bitrate) encoding, for instance, pick a value between 65 to 100Mbps depending on the bitrate of your source material.
Choosing the VBR (Variable Bitrate) option, however, will give you more flexibility and greater control in terms of image quality and file size. As a rule, the Target Bitrate is the setting that determines the actual size of the rendered file, whereas the Maximum Bitrate is mainly responsible for those parts of your footage containing some high-quality graphics or high motion video.
Furthermore, the VBR, 2 pass Bitrate Encoding would be the best choice since it provides the highest image quality. Keep in mind, though, that this option will extend the render time, but if you are a pixel peeper, you should definitely opt for this option. Recommended values between 65 and 85 Mbps for your Target and Maximum bitrate respectively should be more than enough to retain maximum image quality for most of your 4K projects, but again make sure that those are relevant to the bitrate of your source material.
In addition, confirm that your export video settings match perfectly the ones of the clips on your timeline as well as Render at Maximum Depth and Use Maximum Render Quality are also enabled before you hit either the Queue or Export button. Optionally, you can save your custom export settings as a Preset by clicking on the down arrow icon to the right at the top of the Export Settings dialog box so that you’ll be able to access them as quickly as possible next time you need to upload high-quality 4K videos to YouTube.
[source: Maxwell Ridgeway]
Disclaimer: As an Amazon Associate partner and participant in B&H and Adorama Affiliate programmes, we earn a small comission from each purchase made through the affiliate links listed above at no additional cost to you.
Claim your copy of DAVINCI RESOLVE - SIMPLIFIED COURSE with 50% off! Get Instant Access!


Thanks for this write up! Its worth saving and coming back to !
I shoot 4k on my smartphone;Samsung Galaxy Note 5, sometimes the video file is not as large as I expected. And I never adjust or set bit rate…can’t wait to start using 35Mbps to 45Mbps…can’t wait to see the difference!
Glad we can help! Cheers!
just upload in prores 4444 and youtube will take care of the encoding 🙂
As far as I know, on Samsung phones you’ll shoot UHD (3840×2160) at 29p around 45 mbit/s. You basically can not change bitrate on your phone, only resolution. If you upload these videos directly the bitrate will not change. If you choose to import your compressed videos (like h264 in a mov/mp4) into a NLE like Premiere to edit them, a rule of thumb is to oversample by twice the bitrate to eliminate loss of quality (if you convert the same video at 45 mbit/s many times you’ll lose some details over time, as it’s a lossy codec). Default export bitrate from Premiere the first time you use it is 10/12 mbit/s, so if you’ve never changed this you’ll probably see a difference.
Although, I don’t think you’d be able to spot any difference on a cell phone video if you export at 45 mbit/s with no oversampling, there are plenty of other artefacts that follows from a small sensor, variable shutter speeds and stabilizing.