
No filmmaker should forget about audio. Arguably it is at least as important and potentially more so than the actual video quality. Getting the basics down can be done with a little practice, but it is the secret tips and tricks that can elevate your audio just a touch more. One area where some knowhow can go along way is with lavaliers.
Filmmaker Mark Bone put together a video about some of those lesser known lav techniques to help filmmakers up their audio game. It details the different types of lavs, ideal placement, how to run the cables, and plenty more.
Mark got audio pro Dane Kelly to contribute his tips. It was a long conversation the two had about how to lav people up and get good audio. This video takes some of those best bits.
The Tools
Before you get started it is helpful to make sure your kit has all the tools that you might need to get the best audio. Every outfit and individual might call for a slightly different mic or accessory to get the best quality.
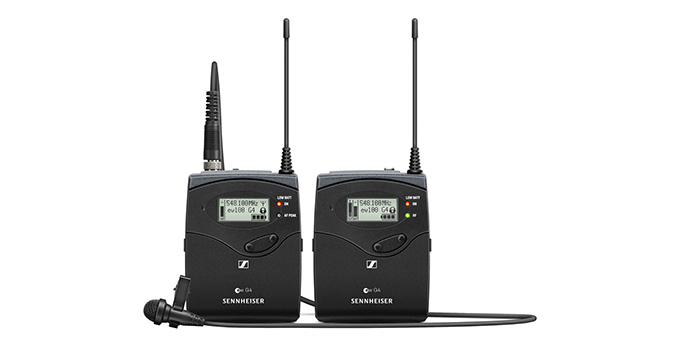
Image Credit: Sennheiser
Dane pulls out a Sennheiser G4 with the included lavalier. It’s a decent mic but the actual microphone part is fairly large. The extra surface area makes it harder to mitigate rustling from clothing. He then pulls out the Sanken COS-11D – an industry standard lav—and shows how it is half the size of the Sennheiser. This makes it easier to place and minimizes clothing rustle.
There are a ton of mounting options. For something like an interview or vlogging where you aren’t trying to hide mics all the time you can just clip it onto a shirt. Mark actually shows how he used to try and hide them by keeping the mic in the shirt and Dane immediately recognizes it as bad placement.
Proper Lav Positioning
To get the best sound, no matter what your mic is, you need it positioned properly. For a lavalier the ideal place is the center of the chest since that will pick up the clearest.
The closer the mic is to the throat the more frequency issues come through. Sometimes you are limited with your subject and in those cases you’ll need to try for the best and do some EQ adjustments in post.

Image Credit: Sanken
Preparing the Lav
Getting good placement requires some fun tools. Dane pulls out a set of mounts, each with its own advantages. One of his favorites is this rectangular rubber holder which he pairs with a wind cap when needed.
By modifying placement in the rubber mount you can protect against a decent amount of wind noise without losing too much from your subject. Usually with the rubber mount you can use medical tape and double-sided tape to attach the mic to the person or the inside of their clothing. For extremely windy days he might even add a Rycote Windjammer.
Placing the Lav on the Subject
We already mentioned tape, but now it is time for the details. The main two tapes in his kit are snot tape and medical tape. Both are hypoallergenic and safe to apply directly to skin. Medical tape is best for the skin.
When considering how to attach it you generally want to attach it to the side that will make the most noise when rubbing against the mic. For example, a thick shirt will make a louder rustling and it is best to attach to the shirt directly. However, sometimes the mic will show and you’ll have to adjust placement based on what works.

Image Credit: Rycote
One other thing to watch out for is if your subject is sweaty. Tape on sweaty skin just won’t hold over time so in those cases the shirt might be better. Hair is another problem. Tape and hair don’t get along when you have to remove it so you don’t want to cause anyone any pain.
Using three pieces of tape, he mounts the mic to Mark’s chest. He then also snakes the wire off to the side with a little slack and then has a piece of tape hold it there. This avoids just having the wire show up going straight down the chest.
Shotgun Vs Lavalier
A final test is between a shotgun or boom mic versus a well-placed lavalier. With the shotgun you are hearing a fuller, more natural sound since it picks up a bit more of the space.
Lavaliers can be a bit tight and there is the potential for inconsistent pickup if your subject is moving or if they are very animated.
There is a ton of good information if you have never properly learned how to mic someone up. It’s a critical tool for filmmaking.
[source: Mark Bone]
Order Links:
- Sennheiser G4 Wireless Lavalier Microphone System (B&H, Amazon)
- Sanken COS-11D Lavalier Microphone (B&H, Amazon)
- Rycote Lavalier Windjammer (B&H, Amazon)
Disclaimer: As an Amazon Associate partner and participant in B&H and Adorama Affiliate programmes, we earn a small comission from each purchase made through the affiliate links listed above at no additional cost to you.


